
DIY Wood Waterfall Table
If you are a big Pottery Barn, West Elm, or Crate and Barrel fan like me, you are more than likely familiar with the beautiful wood waterfall tables on their sites. While I absolutely love the look of them I’m not a fan of their price. I have seen these types of tables range anywhere from $500 – $1500 on various websites. Now don’t get me wrong, I’m sure their quality is amazing. And who am I kidding if I had the money I would most definitely purchase one. However, at the moment I just couldn’t justify the price.
I had been craving change in our little entryway for quite some time. After a failed attempt to salvage the previous entryway table that we had I decided that I was going to build one myself.
In this post I will walk you through the step-by-step process of how I built this DIY waterfall table for only $50!
Disclaimer: I already had most of the supplies needed for this project at home. Price will vary depending on what you have on hand and the size of your build.
Important note: This post will specifically go through the steps for a smaller table, 24in L x 32in H x 12in D to be exact (or similar to this size). As far as wood materials go I used common boards. Since the size of my table is relatively small it worked out great. However, if you were to build this table on a larger scale I would suggest attaching multiple 2×4’s together rather than one large piece of wood per side for more durability.
Supplies Needed:
- 1 x 12 x 8ft Common Board
- Tack cloth
- Wood conditioner
- Wood stain
- Wood glue
- 18 Gauge x 3/4 in brad nails
- Brackets
- Wood putty
- Polyurethane
- Pencil
Tools Needed:
- Miter saw (or saw of choice)
- Orbital sander
- Brad nailer
- Drill
- Corner clamps
- Speed square
- Tape measure
SHOP SUPPLIES & TOOLS HERE

Step one: Create your dimensions
The first thing you’ll want to do is figure out what dimensions you’d like your table to be. I personally wanted my table to fit into a tiny space next to our staircase. I found that the best dimensions for me would be to build a table that was 24 inches in length, 32 inches in height, and 12 inches in depth.
Step two: Cut your pieces to size
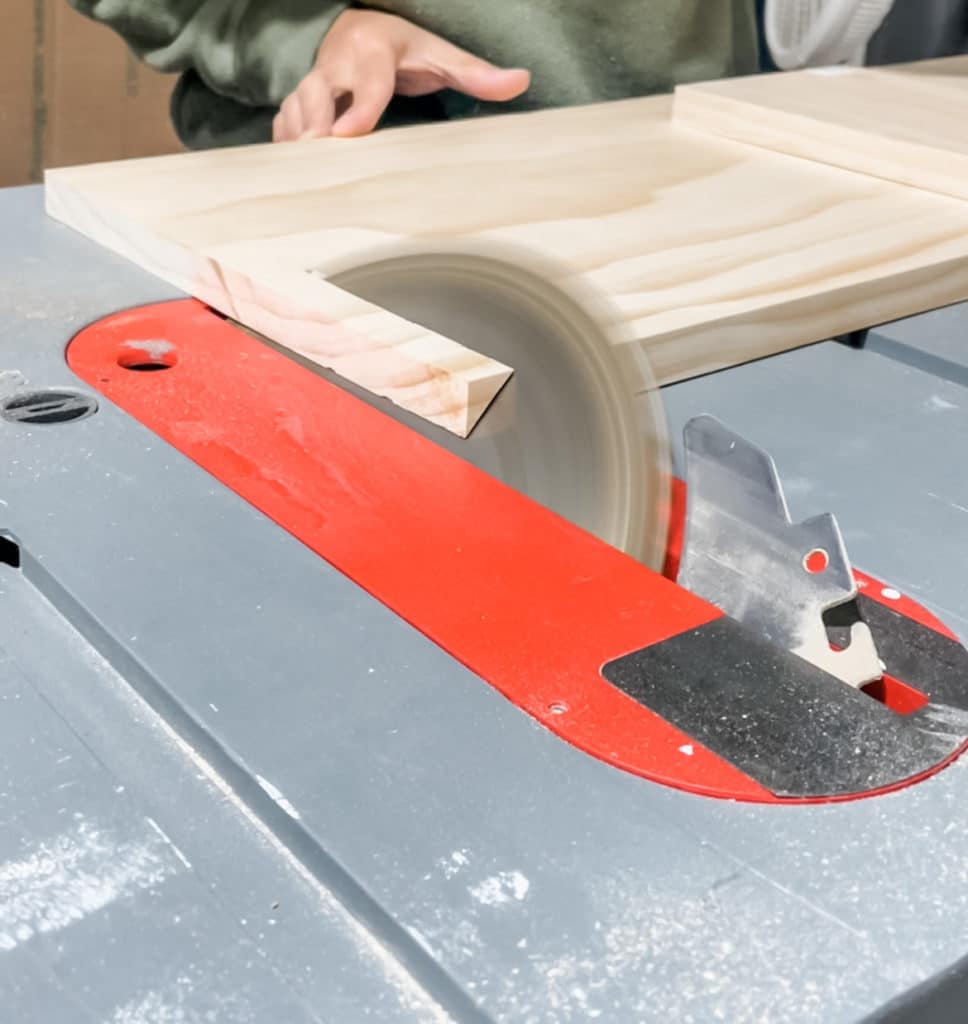
Next take your wood board and split it into three (two side pieces + tabletop) using the dimensions you created. I used our table saw but you can use whatever saw you have on hand.
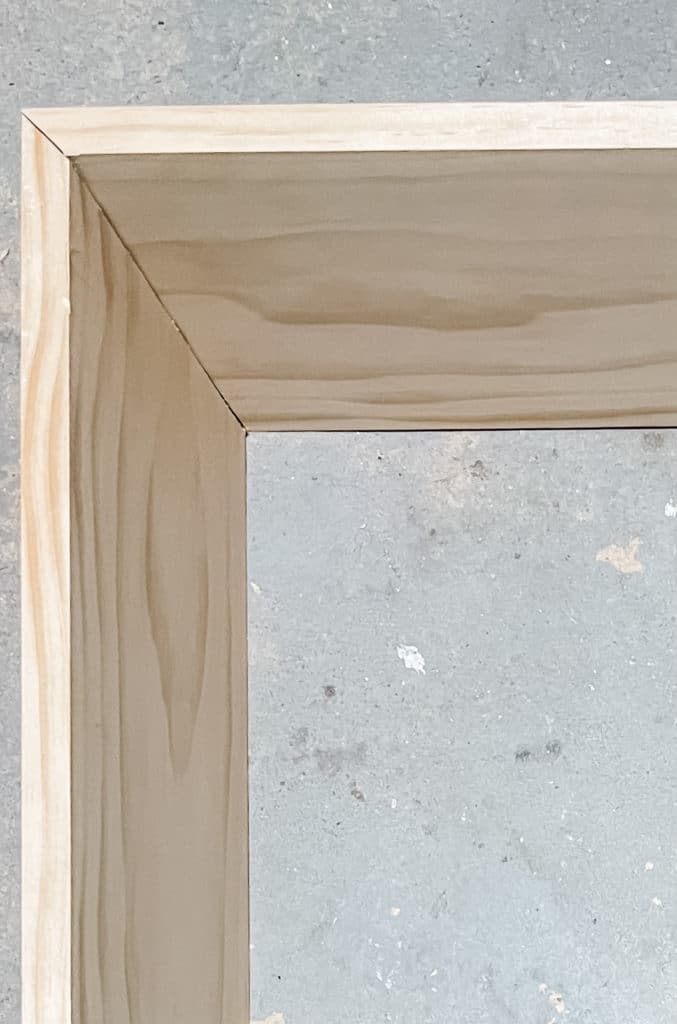
Before you cut your pieces decide whether you want your table to be assembled using a classic butt joint technique or by using bevel cuts instead.
If you decide to use a classic butt joint, your cuts will be straight. If you go with a miter joint like I did (45 degree angle to be exact) you will need to create bevel cuts. I will link a youtube video here that is great at explaining how to achieve a bevel cut.
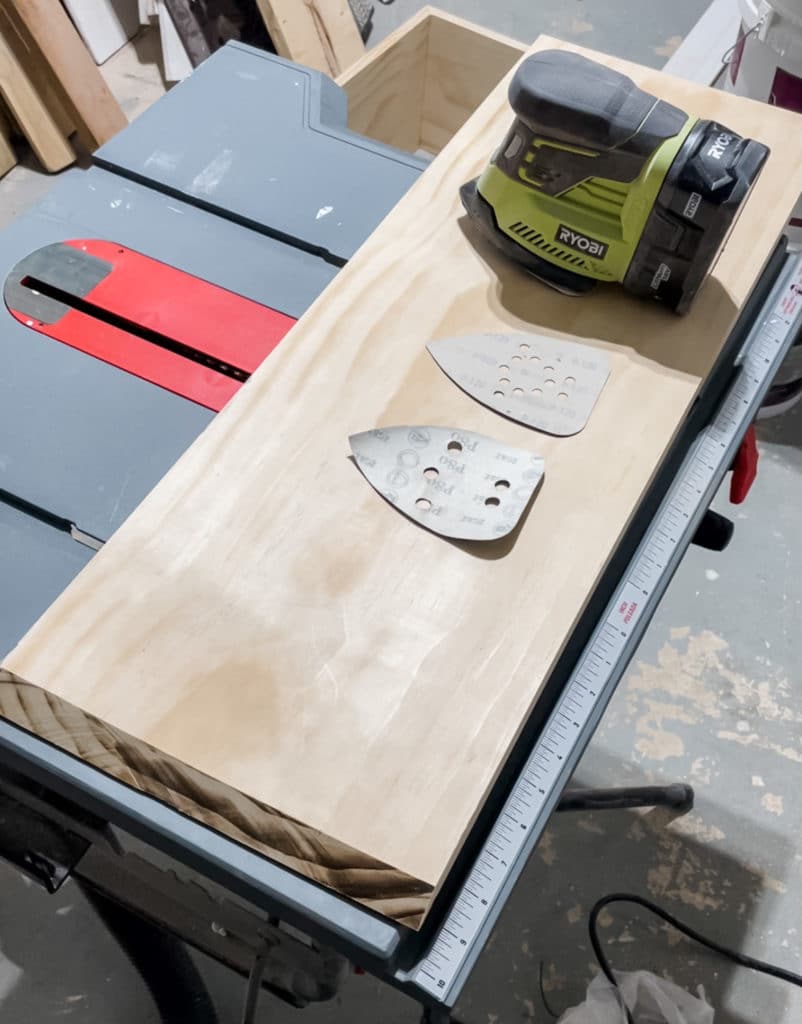
Step three: Prep Wood
To prep the wood for stain use 80 grit sanding paper followed by 120 grit paper to create a smooth surface.
Wipe down excess sand dust with a tack cloth or vacuum.
Optional step: Distress wood for a more rugged look.
Step four: Stain Wood
Apply a thin layer of wood conditioner. This will ensure that your stain goes on evenly and smoothly. Follow the product directions to allow for proper dry time.
Apply stain color of choice. Start off lightly, wipe off excess, and continue to build the color until you have reached your desired look.
Important note: Keep in mind that if you decide to distress your wood, the distressed areas will require heavier coats of stain. Your stain color will also pick up darker in the distressed areas.

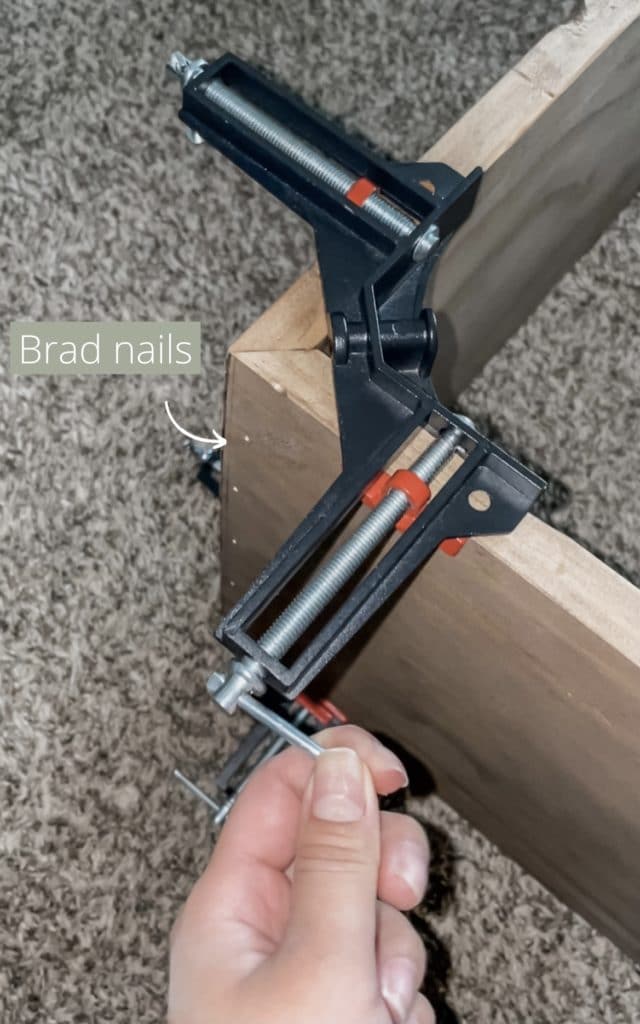
Step five: Assemble pieces together
Start off by applying a layer of wood glue to the first two edges that you’ll be attaching together. Keep your glue layer fairly thin as using too much can cause seeping though the cracks.
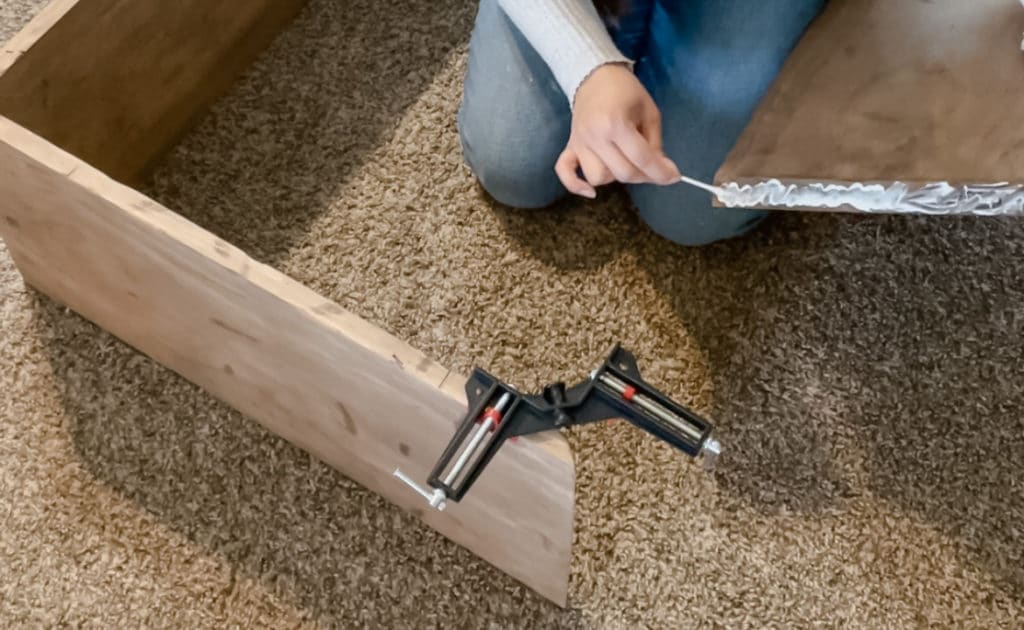
Bring the two pieces together. Use corner clamps to keep pieces attached while the glue dries. Use a a speed square to double-check that you have a 90 degree angle between the two pieces to ensure that your table will stand up straight.
Follow wood glue directions and allow for proper dry time.
Once the glue is dry use a brad nailer to secure the two pieces for additional strength.
Repeat this step on the other side to attach the final piece.
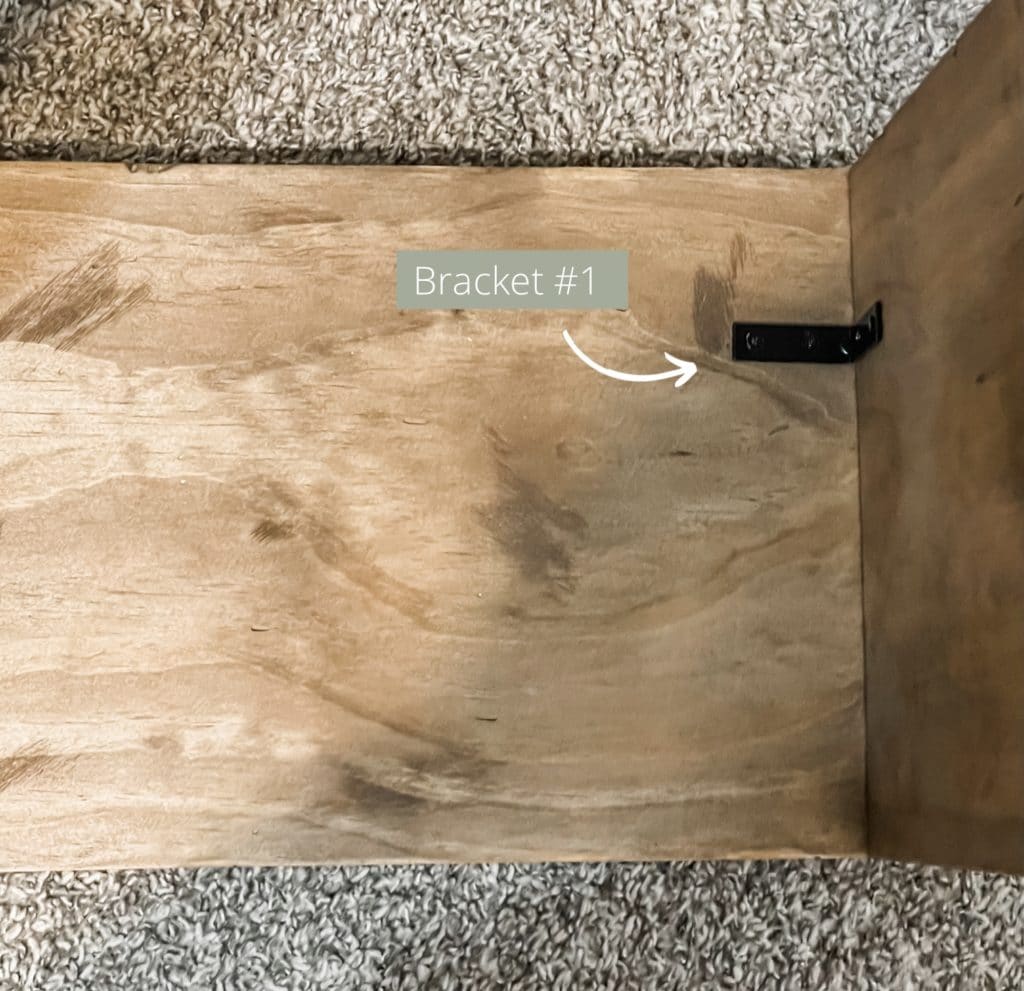
Optional step: I was quite surprised with how sturdy the table was with just the wood glue and brad nails alone. However, to avoid any problems in the future and because I will be displaying decor on this table I decided to add 2 in. corner brackets underneath the table for additional support.
If you buy your brackets in a pack, they usually come with corresponding nails. Double check to make sure you have a proper nail length before drilling.
Typically you would apply a bracket at each corner of the table. To avoid these being seen, I placed mine closer to the middle of the inner surface on the table. Buying black rather than silver brackets also provides a sleeker look just in case they do peak through.
Step six: Touch up & Seal
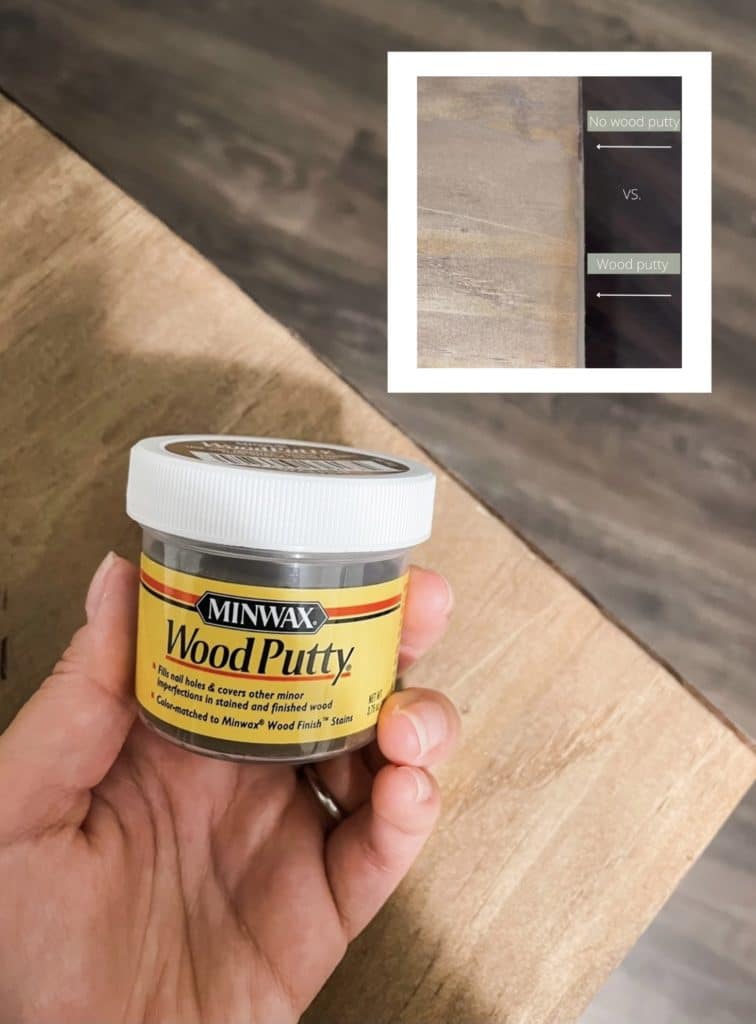
If you’re cuts weren’t exactly perfect then you’ll most likely need to go back and do a little bit of touch up work. Since I chose to stain my wood prior to assembly (you can most definitely stain it last but I find it easier to do it early on to avoid struggling in those hard to reach spots), I went ahead and used a tinted wood putty to fill in any imperfections.
Finish off by sealing with polyurethane. This provides protection from spills and scratches. I find that satin and matte finishes work best for a natural look. I used a spray polyurethane because it’s the quickest and easiest to use in my opinion.
This has been one of my easiest DIY’s to date making it the perfect project for even beginners!
If you’d like to see more of this project in action check out @ourblissfulnest on Instagram! There you can find a highlight titled “Entryway Table” where you can see step-by-step video progress. As always if you decide to try out this project feel free to tag @ourblissfulnest on your Instagram post or send me a picture via DM or email. I would love to see how it turns out!
Disclaimer: This post contains links in which I do earn a small commission from if you decide to purchase through them. This comes at no additional cost to you and as always your support is greatly appreciated!
The Comments
Simsimma4real!
I love your blog! You’re such an inspiration
Erika
> Simsimma4real!Glad you could find some inspiration here 🙂